The guiding principle of managing incoming connections is to set the TCP server in a non-ending
loop and to wait for the connections at the beginning of the loop with the
server:accept() function. But we immediately see the problem: if we enter a non-ending loop,
all the host programm will freeze at that point. This is absolutely unacceptable!
The answer to this very thorny problem is to transfer
this non-ending loop into an execution path separated from the main execution path of the host program.
There are two different way to do that, which are:
Threads are execution paths that work really parallel to each others
as these execution queues are handled by the operating system.
Demoniak3D works in its thread and the TCP server in its own thread.
In Demoniak3D it is possible since version 1.4.0 to start a LUA script in a real system thread
(run_in_new_thread="TRUE"). An example of a TCP server working in a
system thread is provided in the project.
Coroutines are also separated execution queues but are not managed by the OS.
It is the host program that handles the passage from one routine to another under the condition that
the current coroutine courteously lets pass another one after a quite short lapse of time.
Coroutines are also called collaborative multitreading in the sense that
coroutines must collaborate to get the multithreading work correctly. If a coroutine
for some reason stops collaborating, it is the whole host application that will experience the effects.
This is the working our good old Windows 3.xx that was based on collaborative multithreading.
We now understand that if an application gets the whole system frozen, this is not because of
the windows OS working. It is rather due to a bad collaboration of the application.
In order to correctly collaborate, each loop in the non-ending loop of the coroutine must be done
as quickly as possible. The critical function of the coroutine is the accept() server function.
By default, it is freezing until the arrival of a new connection. This behavior is highly non-collaborative.
We sill therefore fix a maximum value to this freezing which is a time limit set by the server:settimeout() function.
In the DEMO_LUA_TCP_Server_Coroutine.xml demo (downloadable here after), the timeout is set to 10 ms.
But this is not the end of the story. The coroutine has to tell the host system hôte at what time it
is ready to make room for another coroutine.This is achieved by the
coroutine.yield() function. The yield is the last instruction of the non-ending loop.
Due to that function, the host system can notice the execution of the current coroutine and run
another coroutine. Running another coroutine is done through the coroutine.resume() function.
Now, let's have a look in more concrete terms. At first, the function for waiting and in-going connections
management, core of the coroutine:
function runTCPServer()

  local stop_server = 0;
  local num_cnx = 0;

  while( stop_server==0 ) do

    local err = "";
    local tcp_client = 0;

    -- Set a timeout of 10 ms for accept().
    --
    g_tcp_server:settimeout(0.01);
    tcp_client, err = g_tcp_server:accept();

    if tcp_client~=nil then

      -- client message must be terminated by
      -- terminated by a LF character (ASCII 10),
      -- optionally preceded by a CR character (ASCII 13).
      --
      g_client_msg, err = tcp_client:receive('*l');

      if( g_client_msg~=nil ) then
        if(g_client_msg=="STOP") then
          stop_server = 1;
        else
          -- tcp_client:send( "Demoniak3D TCP Server Echo: " .. g_client_msg);
        end
      end

      if tcp_client~=nil then
        tcp_client:close();
      end
    end

    -- Yield execution.
    --
    coroutine.yield();

  end
end
Creating the coroutine is performed in the initialisation part
with the coroutine.create() function. Its parameter is the function to be
run by the coroutine. coroutine.create() returns a handle on the
newly created coroutine:
g_tcp_co = coroutine.create( runTCPServer );
This handle will allow us to execute the coroutine at regular intervals thanks to
the coroutine.resume() function, as shown in the following code:
coroutine.resume( g_tcp_co );
coroutine.resume must be regularly called. A quite simple solution in real time 3D
applications is the main loop for updating and rendering. In our case with Demoniak3D,
we just need to create a script with a run_mode="EXECUTE_EACH_FRAME" and to include the call to
the resume() function.
Once the in-going connection is accepted, the TCP server receives data from the client with the
server:receive() function. The '*l' parameters indicates that the end of the data is marked with
an end of line character (LF or \n). The TCP server works in echo mode: it sends back the receivd data
to the client with the server:send() function.
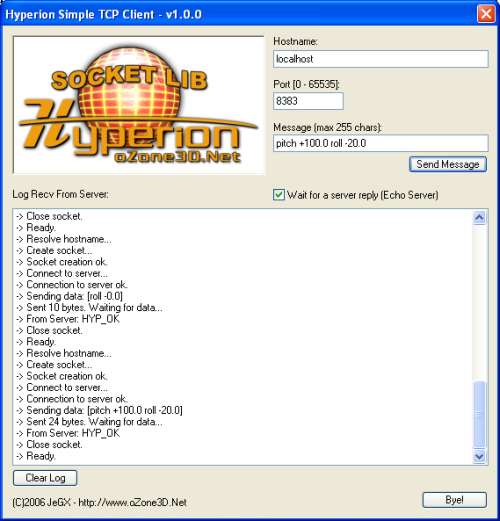
For an easy test of the TCP server, I've prepared a little generic TCP client:

Its working is very simple: just enter the name of the server (string character
representing the hostname or IP adress- for example: 127.0.0.1), the port number of the server
and the message to be sent. The TCP client automatically ads a '\n' at the end of the message
in order to respect the server protocol. Pressing [Send Message] will send a message to
the server. The answer of the server then appears in the bottom area. That's all.