RaptorGL is a 3D engine especially built for the tutorial section of the
oZone3D.Net site (that's true, we don't let
ourselves go short!). This engine is aimed to give a good idea of how things work deep insideHyperion.
This engine is somehow an answer to feedbacks regarding some tutorials received from the community which were concerned
about how things are implemented "in the wings" of
Hyperion.
RaptorGL is a 3D experimental engine in the sense that it provides a testing platform
within the reach of everyone in order to build up and to experiment new real time 3D algorithms. The
release of RaptorGL will be done depending on the requirements of the new upcoming tutorials.
For the moment, a few functionalities are available but the engine offers anyhow a quite complete interface in order
to deal with the GLSL shaders (two codepaths are available for GLSL: the ARB codepath and the GL2 codepath).
The main interest of RaptorGL lies in the total availability of the sources codes.
Nothing is better than a full immersion in the code for a good understanding of an engine.
RaptorGL may also be a starting point for building your own 3D engine.
Actually, the fundamental briks are working and adpating these functionnalities to your own specific
needs can be done quite easily.
Right now, the main functionnalities of RaptorGL are the following one:
- Polymorphic renderer - OpenGL 2.0 implementation in progress - GLSL shaders - VBO
- Memory Manager - memory allocation and tracking of memory leaks
- Log Manager - log reporting and other useful debug informations
- Object Factory - centralised creation of all entities of the 3D scenes
- Dynamic lights
- Materials (but not yet textures - be patient, it will be available very soon!)
- Mesh - (built-in shapes: torus, box and plane) - 3D model loading not yet available.
The goal is not to turn the engine into a complete 3D engine, which would require several
months or years. The missing functionalities will be added little by little according to the tutorials.
The actual functionnalities are sufficient for the first tutorials
such as this one: Mesh Deformer.
RaptorGL is provided as a static library designed to be linked with your project.
I will not go through details regrading the compiler configuration, there are many forums for that all over the net.
The example projects are intended for Visual C++ 6.0. The conversion into VC2005 should not pose any problem (except
the billion of warnings that are generated by the new security standards in the Microsoft spirit...).
The use of the engine is quite simple and logical. A 3D demo can be maid in the following way:
- 1 - initialisation
- 2 - rendering loop (endless loop as long as not end)
- 2.1 - scene update
- 2.2 - scene rendering
- 3 - ressources release and end
The first step of the scene initialisation is the init of the engine itself.
This is done by the following code:
RaptorGL::getInstance()->initialize();
The next step is to create a renderWindow. The renderWindow offers an
access to the framebuffer of the 3D scene. This task is not necessary if you already have
your own renderWindow, which is the case with some libraries such as the GLUT library.
The following code shows how to create a renderWindow:
pRw = RaptorGL::getInstance()->createRenderWindow( RGL_RENDERER_OPENGL );

memset( &RWCtx, 0, sizeof(RglRenderWindowContext) );

RWCtx.m_width = w;
RWCtx.m_height = h;

RWCtx.m_wndHwnd = hWnd;

pRw->create( &RWCtx );

RaptorGL::getInstance()->setCurrentRenderWindow( pRw );
The next step is the OpenGL renderer creation. RaptorGL being a polymorphic
renderer core, several kind of renderers can be available (OpenGL, Direct3D, software).
Actually, only an OpenGL renderer is available. But I hope to start very soon the
Direct3D renderer (dx9 first!). The following code shows the creation of the renderer:
RaptorGL::getInstance()->createRenderer( RGL_RENDERER_OPENGL );
Now that the main functionnalities are initialised, we can tackle the
scene creation and its population. A scene is created the following way:
scene = RglSceneMgr::getInstance()->createScene( "Main_Scene" );
After creating the scene, the first thing to do is to include a camera. The following code
shows how to create a perspective camera with a FOV of 60.0 degrees:
cam = (RglCamera *)RglSceneNodeMgr::getInstance()->createNode(RGL_SCENE_NODE_CAMERA,
	                                                 "Main_Camera"));
scene->insertNode( cam );

cam->setProjPerspParams( 60.0, aspect, 1.0, 1000.0 );

cam->setViewParams( &RglVec4(0.0, 30.0, 50.0),
	                &RglVec4(0.0, 0.0, 0.0),
		            &RglVec4(0.0, 1.0, 0.0) );
Let's add now a little light in order to light the objects of the scene
and to set up the position and color parameters:
light = (RglLight *)RglSceneNodeMgr::getInstance()->createNode(RGL_SCENE_NODE_LIGHT,
							"Light01"));
scene->insertNode( light );

light->setAmbient( &RglVec4(0.0, 0.0, 0.0) );
light->setDiffuse( &RglVec4(1.0, 1.0, 1.0) );
light->setSpecular( &RglVec4(0.0, 0.0, 0.0) );
light->setPosition( &RglVec4(0.0, 50.0, 100.0) );
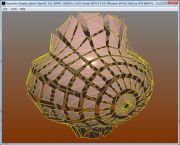
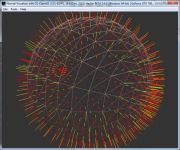
The last step of the initialisation is to add a "real" object, which means a mesh.
Let's add, just to be original, a torus:
torus = (RglMesh *)(RglSceneNodeMgr::getInstance()->createNode(RGL_SCENE_NODE_MESH,
	"MeshTorus"));
scene->insertNode( torus );

torus->buildTorus( 20.0, 5.0, 100 );

torus->getShader()->clearMaterialList();
u32 nfaces = torus->getMeshData()->m_numFaces;
torus->assignMaterialToFaces( "torus_mat_yellow", 0, nfaces-1 );
All the visible objects of the scene have the same default material. It is then necessary
to suppress it and to attach a new material (torus_mat_yellow) to the torus .
The settings of the material paramters is done this way:
mat = RglMaterialMgr::getInstance()->getMaterial( "torus_mat_yellow" );
if(mat)
{
	mat->setAmbient( &RglVec4(0.4f, 0.4f, 0.4f) );
	mat->setDiffuse( &RglVec4(0.9f, 0.9f, 0.2f) );
	mat->setSpecular( &RglVec4(0.0f, 0.0f, 0.0f) );
}
All the materials are centralised in a material manager which greatly simplifies their handling.
Now that the initialisation is done, let's look at the endless loop. Its implementation can be done the
following way:
while( !done )
{
	processWindowMessages();

	scene->update( dt );

	scene->renderBegin();

	scene->render( dt );

	scene->renderEnd();

	RaptorGL::getInstance()->displayCurrentRenderWindow();
}
The final result should look like: