The projective texture mapping is a technique allowing a texture to be projected onto
the scene's objects like a slide projector would do it.
The secret of texture projection is based on the texture projection matrix initialization
also called TexGenMatrix. If your 3D engine already performs projective texturing using
the 3D pipeline fixed functions, the texGen matrix may be initialized by the following code:
glActiveTextureARB( GL_TEXTURE0_ARB );
glTexGeni(GL_S, GL_EYE_PLANE, &TexGenMatrix[0]);
glTexGeni(GL_T, GL_EYE_PLANE, &TexGenMatrix[4]);
glTexGeni(GL_R, GL_EYE_PLANE, &TexGenMatrix[8]);
glTexGeni(GL_Q, GL_EYE_PLANE, &TexGenMatrix[12]);
This matrix is accessible in the vertex shader by the gl_TextureMatrix[tu] variable
where tu is the texture unit for which the TexGenMatrix matrix has been
initialized (in the example, tu=0).
For those that would like to implement the TexGenMatrix initialization,
just understand that this matrix is somewhat equivalent to the camera matrix.
Indeed, the texGen matrix defines all transformations (projection matrix, view matrix) of the
projector that, in the texture projection context, works like a camera. For more detail on this topic,
see the excellent whitepaper by Cass Everitt: Projective Texture Mapping.
The DEMO_Projective_Texture_Mapping.xml demo shows all the stages of the texGen matrix
construction for projective texture mapping. The construction of the texGen matrix being done
using the great LUA language, the conversion to another language should be a mere formality!
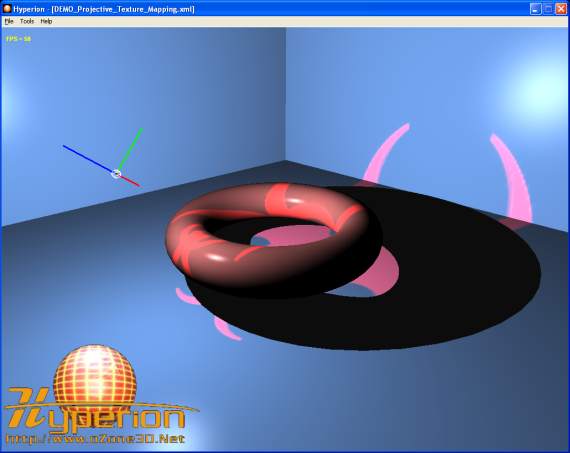
The following image shows the rendering of the DEMO_Projective_Texture_Mapping.xml demo:

Fig. 22 - the DEMO_Projective_Texture_Mapping.xml demo
The major advantage of making the texture projection with shaders is that the
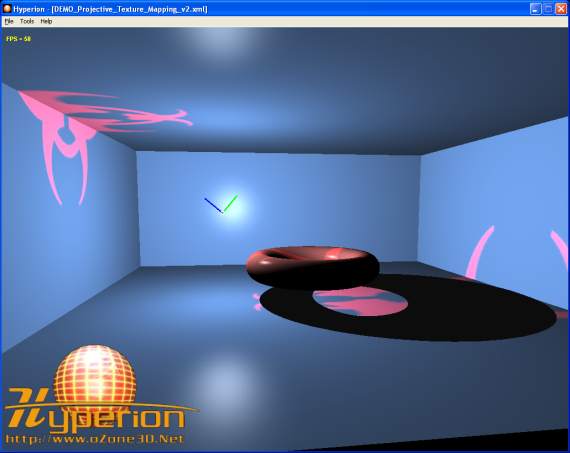
reverse projection can be solved in a simple and clean way. The following screenshot illustrates the
reverse projection:

Fig. 23 - the problem of reverse projection
The projected texture coordinates are obtained by multiplying the TexGenMatrix
by the vertex position in world space (cf posWorld in the code). These coordinates
form a {s, t, r, q} quadruplet. The reverse projection occurs when the {q} coordinate becomes
negative. It is not easy to act on the {q} coordinate at the fixed functions level, but in a
pixel shader it is really simple as shown by the following shader code (from the DEMO_Projective_Texture_Mapping.xml
demo):
[Vertex_Shader]

uniform mat4 TexGenMat;
uniform mat4 InvViewMat;
varying vec3 normal, lightDir, eyeVec;

void main()
{
	normal = gl_NormalMatrix * gl_Normal;

	vec4 posEye =  gl_ModelViewMatrix * gl_Vertex;
	vec4 posWorld = InvViewMat * posEye;
	gl_TexCoord[0] = TexGenMat * posWorld;

	lightDir = vec3(gl_LightSource[0].position.xyz - posEye.xyz);
	eyeVec = -posEye.xyz;

	gl_Position = ftransform();
}


[Pixel_Shader]

uniform sampler2D projMap;
varying vec3 normal, lightDir, eyeVec;

void main (void)
{
  vec4 final_color =
  (gl_FrontLightModelProduct.sceneColor * gl_FrontMaterial.ambient) +
  (gl_LightSource[0].ambient * gl_FrontMaterial.ambient);

  vec3 N = normalize(normal);
  vec3 L = normalize(lightDir);

  float lambertTerm = dot(N,L);

  if(lambertTerm > 0.0)
  {
    final_color += gl_LightSource[0].diffuse *
	gl_FrontMaterial.diffuse * lambertTerm;

    vec3 E = normalize(eyeVec);
    vec3 R = reflect(-L, N);
    float specular = pow( max(dot(R, E), 0.0),
	                     gl_FrontMaterial.shininess );
    final_color += gl_LightSource[0].specular *
	               gl_FrontMaterial.specular *
				   specular;


    // Suppress the reverse projection.
    if( gl_TexCoord[0].q>0.0 )
    {
      vec4 ProjMapColor = texture2DProj(projMap, gl_TexCoord[0]);
      final_color += ProjMapColor*lambertTerm;
    }
  }

  gl_FragColor = final_color;
}
This pixel shader is a variation of the phong lighting one available in the
Point Light
tutorial. The projected texture coordinates are calculated by the following code:
vec4 posEye =  gl_ModelViewMatrix * gl_Vertex;
vec4 posWorld = InvViewMat * posEye;
gl_TexCoord[0] = TexGenMat * posWorld;
where TexGenMat is the texture projection matrix and InvViewMat
is the inverse view matrix. The goal of this last one is simply to calculate
the vertex position in world space. The texture projection is done in the pixel shader by the
following code:
if( gl_TexCoord[0].q>0.0 )
{
  vec4 ProjMapColor = texture2DProj(projMap, gl_TexCoord[0]);
  final_color += ProjMapColor*lambertTerm;
}
The texture2DProj() allows us to directly exploit the projected textures coordinates
stored in gl_TexCoord[0]. The call to texture2DProj() could be remplaced by
a call to texture2D() but in that case we have to divide the {s, t} coordinates
by the {q} one as the following code shows it:
if( gl_TexCoord[0].q>0.0 )
{
  vec2 projCoords = gl_TexCoord[0].st / gl_TexCoord[0].q;
  vec4 ProjMapColor = texture2D(projMap, projCoords);
  final_color += ProjMapColor*lambertTerm;
}